
Photo to anime converter
Photo to Anime: Turn a Real Photo into Anime Art
Upload one portrait, selfie, pet photo, or character reference and convert it into a focused anime illustration. Choose how closely the result should follow the source, how the background should be handled, and which anime rendering fits the final use.
Convert your photo
One source image, one focused anime result
0/600
Generation requires sign-in and account credits. A final failed job is refunded automatically.
Anime result
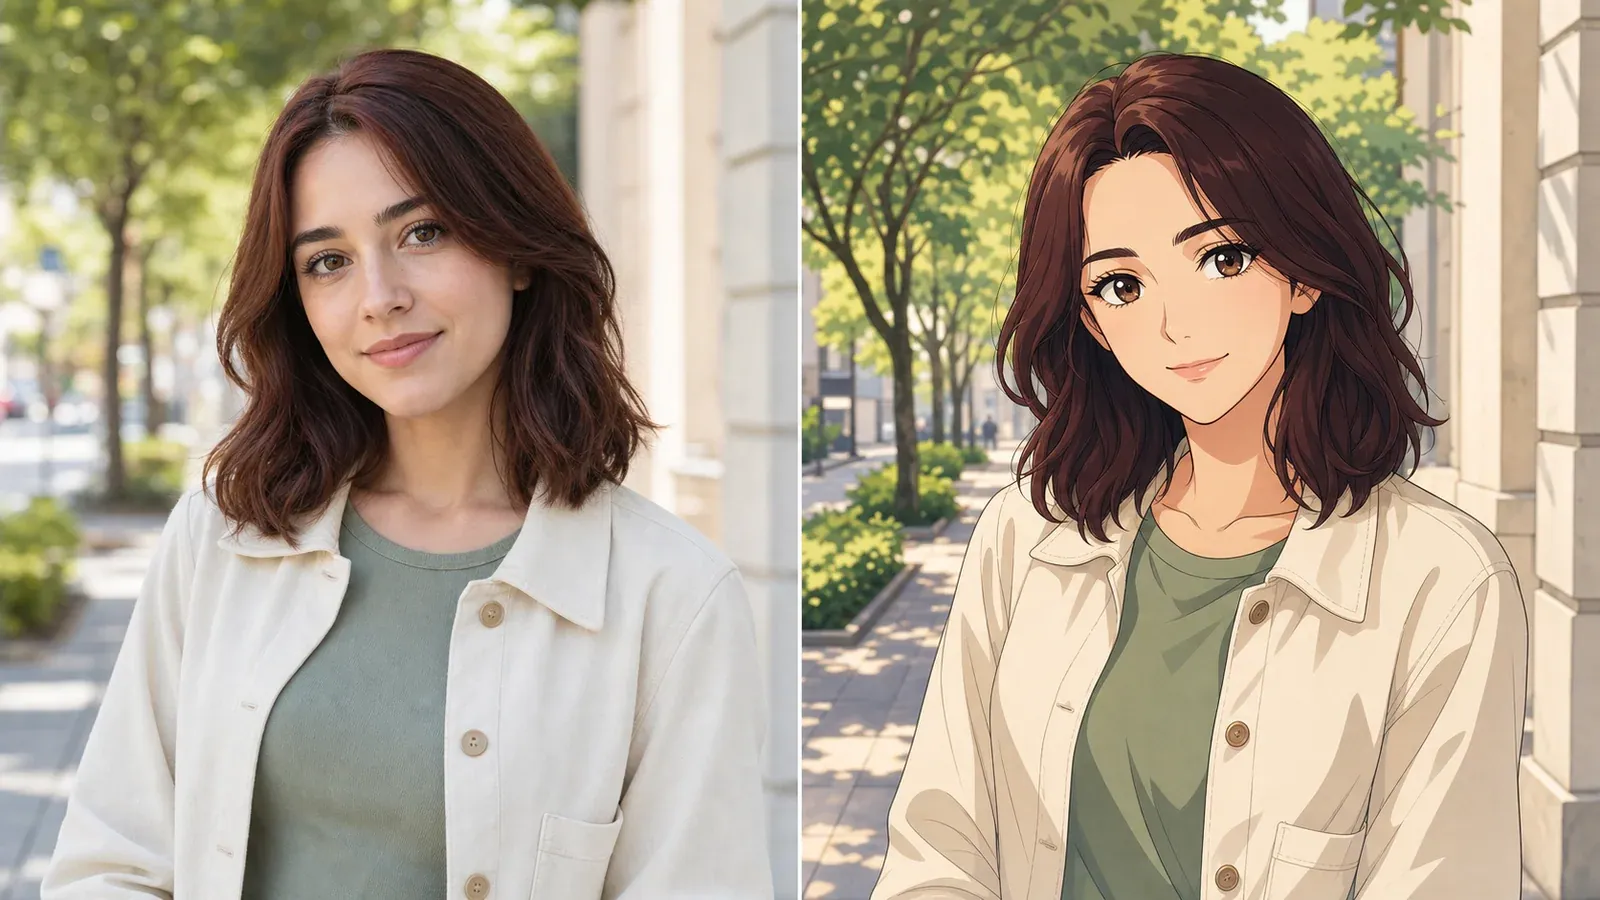
Generated example
A useful conversion keeps the person readable
This fictional before-and-after pair shows the practical target: the anime image changes the rendering system, but the subject remains identifiable through the crop, hair shape, jacket, shirt color, expression, and setting. It does not prove that every source will match perfectly. It shows which details are worth checking after a job completes.
- Same subject and waist-up framing
- Recognizable hair and clothing palette
- Anime linework rather than a generic filter
- Background translated without changing the scene
Conversion workflow
Convert a photo to anime online
Photo to anime conversion is an image-to-image task: the uploaded photograph supplies the subject, pose, camera crop, clothing, and scene, while the selected controls tell the image model how to redraw that evidence as anime art. That is different from typing a free-form character prompt. You are not asking for an unrelated character who happens to share a few traits; you are asking for an illustrated interpretation of a particular source image.
Start by selecting one PNG, JPG, or WebP file under 5MB. The browser shows a local preview before anything is queued, so check that you chose the correct image. Then select a final use. Profile portrait favors a readable face and compact crop. Character reference favors visible clothing and pose. Social post asks for a strong central subject, while Gift or print favors a balanced keepsake composition. These choices are included in the actual generation prompt rather than displayed as decorative labels.
Next choose the anime rendering. Clean cel anime uses precise outlines and restrained two-step shading. Soft watercolor anime keeps fine linework but allows quieter edges and paper-like color variation. Manga ink emphasizes drawn contours, hatching, and a limited color accent. Cinematic anime uses more dimensional light and key-art polish. The style selector changes the medium; it does not license the model to replace the person, outfit, or number of subjects.
Source fidelity controls the balance between likeness and stylization. High likeness tells the model to prioritize recognizable facial structure, hair, pose, and clothing. Balanced allows more anime proportion and simplification while keeping the same subject readable. More stylized allows stronger anime shape language. If the first result changes too much, move fidelity toward High likeness before adding a long corrective prompt.
Background treatment is a separate decision because the source setting can help or hurt the subject. Keep setting asks for the same location and major spatial relationships. Simplify setting retains the place but removes distracting detail. Plain background replaces the scene with a quiet color field. Use Plain for profile pictures or a clean character reference. Use Keep setting when the environment carries the story, such as a café uniform at the counter or a cyclist beside a recognizable trail.
Use the optional direction field for a short list of details the controls cannot express: keep the freckles, retain the navy coat, preserve the evening window light, or remove a distracting sign. Do not rewrite the whole photograph in prose. The image already contains the visual evidence, and a crowded instruction can introduce conflicts. After sign-in, the conversion runs here and the finished image can be downloaded as a PNG.
Convert a photo nowPortrait workflow
Turn selfies and portraits into anime art
A selfie and a formal portrait do not provide the same information. A close selfie usually gives the model a clear face but may distort the nose, jaw, or forehead because of a wide phone lens. A portrait taken from a little farther away often gives more natural facial proportions and shows the hairstyle, neck, shoulders, and clothing. If you can choose between two sources, use the image that makes the details you care about easiest to see, not simply the one with the highest pixel count.
For an avatar, crop is important. Leave a small margin above the hair and enough room around both shoulders. A source cut tightly through the hair or chin gives the converter no evidence for what lies outside the frame. The generated result may then invent an edge or produce an awkward profile crop. Select Profile portrait and Plain background when you need a clean square-ready image, but keep enough source context for the face and hair silhouette to remain complete.
Expression survives best when it is readable rather than extreme. A relaxed smile, focused gaze, or neutral look usually translates cleanly. Closed eyes, motion blur, a hand covering the mouth, reflective glasses, and deep shadow can hide the landmarks used to interpret the face. The converter is not performing biometric identification; it is redrawing visible cues. If those cues are absent, no setting can recover them with certainty.
Group portraits require extra caution. The job prompt tells the model to preserve the number of people, but closely overlapping faces, crossed arms, and partially hidden bodies remain difficult image-editing conditions. For an important group keepsake, start with a photo where each face is large enough to inspect and silhouettes do not merge. Generate once, then check each person separately. Do not assume that a convincing overall composition means every small face or hand is correct.
The three-style example in this section uses the same fictional cyclist, pose, helmet, jacket, and bicycle. The comparison demonstrates why style and fidelity are different controls. Cel shading, watercolor texture, and manga ink can change surface treatment while the core subject remains stable. If a style test changes identity or removes useful clothing details, choose High likeness and Character reference, then regenerate before deciding that the source is unsuitable.
For pets, toys, or costumed characters, the same principle applies: make the defining silhouette, face, coat markings, clothing, and props visible. Anime rendering can simplify fur and material texture, but a clear source still helps the model retain ear shape, color patches, collar, costume edges, and pose. Avoid claiming an exact replica. Review the result as a new illustration derived from the source, especially before printing or sharing it as a portrait of someone else.
Try a portrait conversion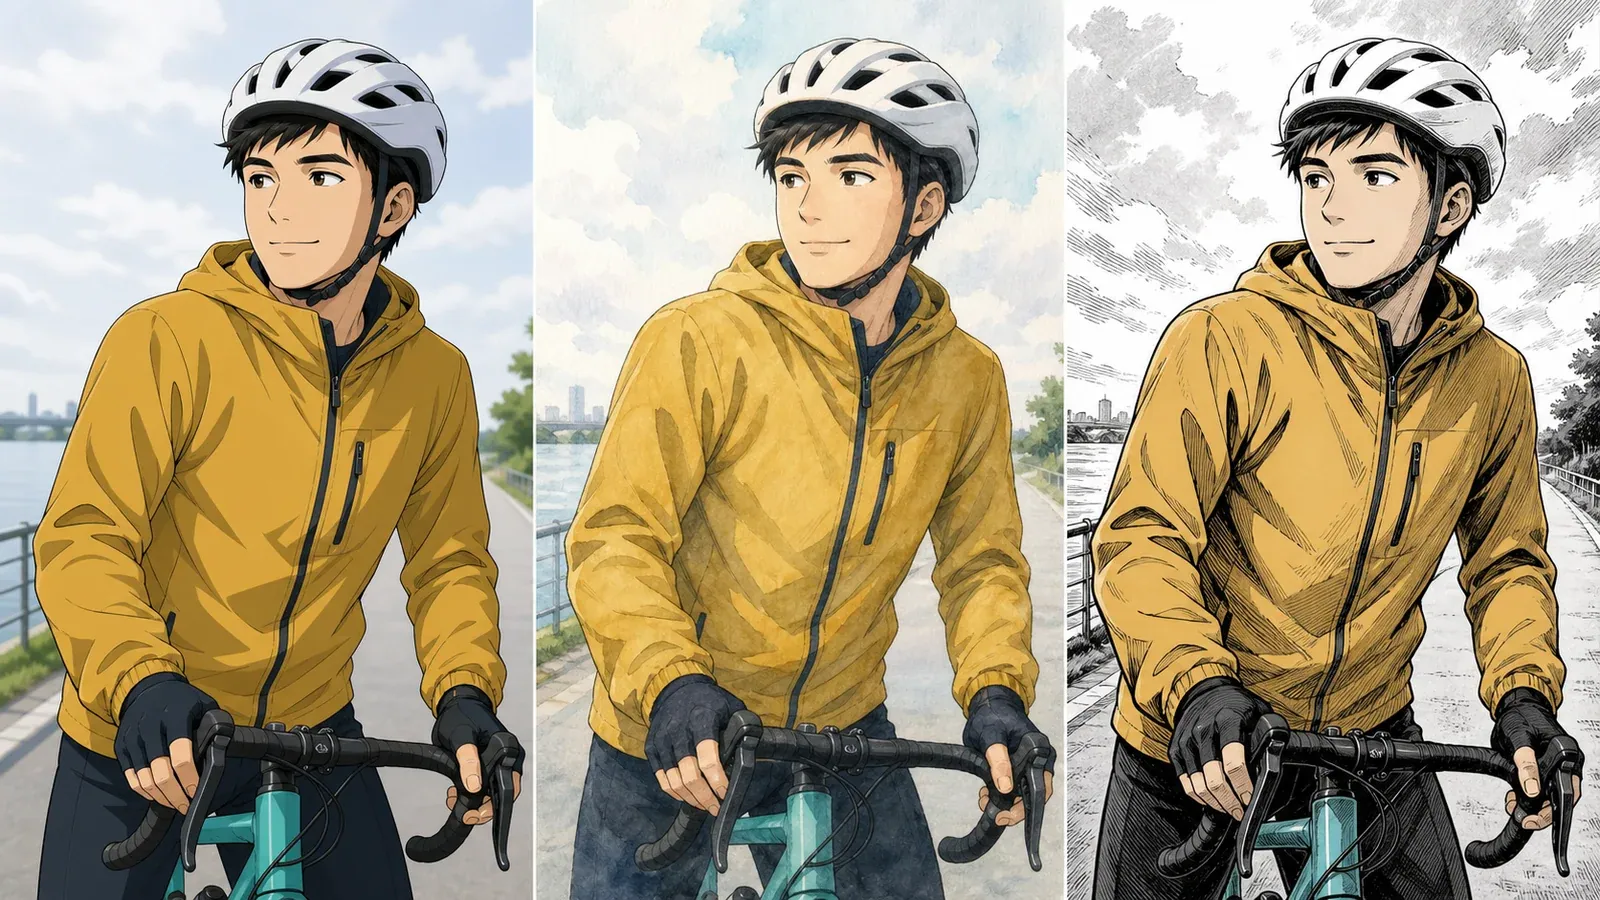
Control the interpretation
Preserve pose, clothing, and key facial details
Preservation begins with priorities. A photograph may contain hundreds of visual details, but only some define the person or character. Before generating, identify five or six anchors: face shape, hairstyle, one distinctive facial cue, outer garment, dominant colors, pose, and a story-relevant object. Use the optional direction for anchors that could be overlooked. A concise note such as “keep the round glasses, copper streak, green bomber jacket, and sketchbook” is more actionable than “make it look exactly the same.”
Pose is easier to retain when joints and hands are visible. If one arm disappears behind the torso, the model must infer its position. If hands overlap a patterned shirt or busy background, fingers can merge with nearby shapes. High likeness tells the model to prioritize the existing pose, but it cannot expose information that the camera did not capture. Choose a source with clear limb separation when the gesture matters to the final character reference.
Clothing should be treated as structure, not only color. A navy coat might include a wide collar, double-breasted buttons, rolled cuffs, and a belt. If those parts matter, name them. Anime simplification often removes small seams, fabric texture, or repeating patterns to keep the drawing readable. That can be a useful design decision, but it may be wrong for cosplay documentation, a uniform reference, or a commissioned keepsake. Review garment construction rather than checking only whether the color stayed blue.
Facial likeness in anime is interpretive because real skin texture, eyelids, nose volume, and subtle asymmetry are reduced into line and shape. High likeness can preserve broad geometry and distinctive cues, but it should not be presented as an identity guarantee. Compare the output with the source at the same size. Check hairline, eyebrow angle, eye spacing, nose direction, jaw width, expression, freckles, scars, and glasses. If one anchor is wrong, add only that correction and retry.
Background preservation can indirectly affect likeness. Strong colored light from a sign, window, or sunset changes skin and clothing color. Keeping the setting may preserve that atmosphere, while a plain background can encourage more neutral lighting. Decide whether the colored light is part of the memory or a distraction. For a character reference, neutral light is usually easier to reuse. For a story portrait, retaining the source light can preserve mood and place.
Always inspect hands, text, logos, jewelry, and repeating patterns. Image models can redraw these inconsistently even when the face is convincing. This page asks the model not to add text, logos, watermarks, or unrelated objects, but existing text and tiny symbols in a source may still be altered. If a brand mark, written sign, or exact emblem is legally or narratively important, replace or verify it in a dedicated editing workflow rather than relying on generation alone.
Source photo checklist
Prepare photos for cleaner anime results
Preparation does not require a studio, but the source should make the subject easy to read. Use the original photo when possible instead of a screenshot from a social app. Screenshots may include interface overlays, aggressive compression, or a crop that removes hair and clothing. A modest-size original with clean edges is usually more useful than an enlarged, sharpened copy of a small image.
Choose even, directional light. Window light from the front or a soft outdoor shade can reveal face shape and clothing without flattening everything. Avoid a bright window directly behind the person unless the silhouette is the point. Very dark shadows can hide one eye or part of the jaw; blown highlights can remove hair and skin detail. The preparation example shows how distance, hard shadow, and foreground clutter each remove evidence the converter needs.
Keep the relevant subject large enough in the frame. For a portrait, the face should be easy to inspect at normal browser size. For a full pose, hands and feet should remain visible and separated from the edge. Do not crop away a hat, long hair, coat hem, or shoes if those details need to appear in the anime result. If the source contains a large room and a tiny person, crop a copy around the subject before uploading.
Reduce obstruction. Sunglasses, masks, hair across both eyes, hands over the face, dense foliage, microphone stands, and furniture crossing the body may be valid parts of a photograph, but they complicate a likeness-focused conversion. Keep them when they define the story; otherwise choose another frame. The model can simplify a background, but it still has to decide which overlapping edges belong to the subject.
Use a photograph you have the right and permission to upload. Do not treat anime conversion as a way to bypass consent, impersonate someone, or make misleading identity claims. The output is a new generated illustration and can contain mistakes. If the picture includes children, clients, private spaces, confidential screens, badges, or addresses, review what is visible before submitting it to any cloud image-generation service.
After a weak result, diagnose the source before repeatedly spending credits. If the face changes, try a clearer portrait and High likeness. If clothing disappears, use Character reference and name the garment structure. If the background overwhelms the subject, choose Simplify or Plain. If the render feels generic, choose a more specific anime style but keep the corrective note short. One controlled change gives you more information than changing every setting at once.
Use a prepared photo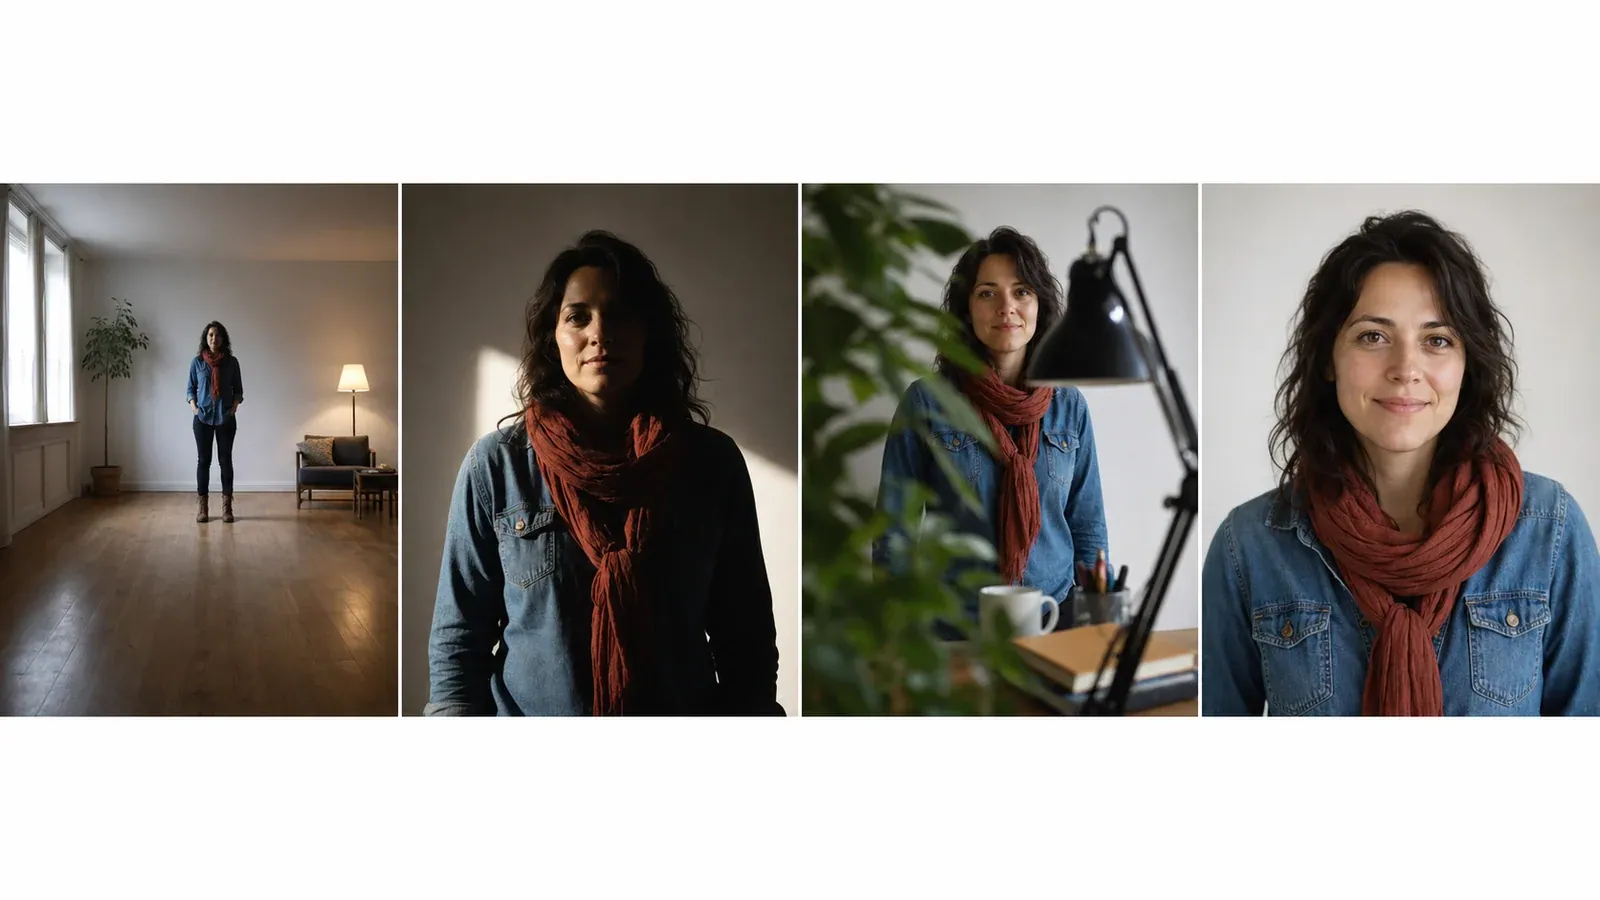
Choose the right workflow
Choose photo to anime when the source image should lead
Use this page when the input is an existing photograph and the desired output is a single anime illustration that stays grounded in that photograph. It is intentionally narrower than a general cartoon converter and narrower than a full comic-production tool. Keeping that boundary clear makes the controls understandable and prevents one page from promising unrelated outputs.
Choose photo to cartoon when anime is not the goal. That adjacent tool supports broader treatments such as clean cartoon avatars, cute family portraits, comic portraits, and pet stickers. Choose anime character creator when you are designing an original cast member from a written brief or need to control framing, expression, and costume without being bound to one existing photograph. Choose turn picture into comic when the whole photographed scene should become comic-oriented artwork rather than one anime portrait.
Review before use
Common weak results and practical recovery steps
A completed job is not automatically a finished asset. The generator may simplify a face too far, change eye direction, merge fingers, alter jewelry, remove small clothing features, or redraw a background object. These are normal review risks for image-to-image generation, not hidden features. Zoom in before downloading and compare the result with the source and your stated priorities.
If a job remains queued or running, keep the page open while its status updates. A temporary network or image-service failure is retried once. If the final attempt fails, the job is marked failed and the charged credits are returned automatically. During the same browser session, the selected source remains available so you can simplify the settings and try again deliberately.
Insufficient credits are different from a failed conversion: no job is created and no credits are charged. The page displays the current balance and links to Pricing. Check the available plan options, then return with the same non-file settings preserved. For browser security, you will need to select the local photo again after signing in.
The output is one flattened PNG. It is not a layered PSD, vector drawing, animation rig, Live2D model, turnaround sheet, or set of consistent comic panels. If the first image will become a recurring character, use it as a reference and document the stable traits separately. Character consistency across later scenes requires a dedicated workflow and repeated review; a single photo conversion cannot establish it by itself.
Photo to anime FAQ
Questions before you convert
Can I turn a selfie into anime?
Yes. A selfie with one clearly visible face, even light, and enough room around the hair and shoulders is a practical source. Choose Profile portrait and High likeness when facial recognition matters more than dramatic stylization.
Does photo to anime keep the same face?
The converter instructs the image model to retain supported facial cues, but an anime drawing necessarily simplifies real anatomy and texture. Treat the result as an interpretation, then check face shape, eye spacing, hairline, distinctive marks, and expression before using it.
Which image formats can I upload?
The live form accepts PNG, JPG, and WebP files up to 5MB. Animated GIF, PDF, and unsupported image types are rejected by this workflow.
What happens if generation fails?
A temporary failure is retried once. If the second attempt also fails, the credits charged for that conversion are returned automatically. You can then use the same local source with simpler settings.
Is this the same as photo to cartoon?
No. This page is limited to anime rendering conventions such as cel shading, manga ink, watercolor anime, and cinematic key art. The photo to cartoon tool covers broader avatar, family illustration, pet sticker, and general cartoon treatments.
Can I use the output as a comic character?
You can use the PNG as an initial visual reference. For a new original cast member, move to the anime character creator to define clothing, accessories, framing, and expressions from a written brief. For a whole photographed scene that should become a comic panel, use turn picture into comic instead.
Ready to turn your photo into anime?
Choose a clear source, set the likeness and background priorities, then review the generated PNG on this page.
Start a photo to anime conversion